Adding Decoration to a Bowl
I don't turn a lot of bowls each year, perhaps 12 to 15 at the most, and often they are small bowls that are never finished because they were used to test a tool or show a student how to turn a bowl. I seldom apply any decoration to a bowl, but occasionally I do get an urge to try something different. This story is about such an occasion.
As Fine Woodworking #50 noted in their coverage of decorative turning (1985), "the patterned bowls in this article were shaped by a router" — but decoration doesn't require power carving. Simple techniques like contrasting-wood plugs, pyrography, or textured cuts can turn a plain-grained bowl into something that catches the eye. The key is restraint: decoration should complement the form, not overwhelm it.
The Project: Contrasting Plugs on a Maple Bowl Rim
Nearly two years ago, I had rough-turned and cored a nice 10-inch maple bowl. I decided to finish it and do some form of decoration on it. The decision was to put a circle of 24 dots of contrasting wood on the top of the rim of the bowl. So, when I finished turning the bowl, I left the top of the rim wider than I normally would. (For the bowl-turning basics, see our ring bowl project or the Burmese blackwood bowl project.)
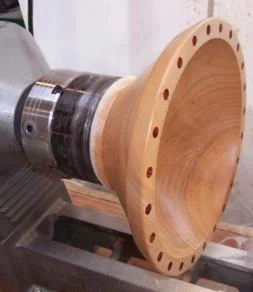
This was shortly after I acquired one of Richard Benham's Rim Chucks so I tried using the Rim Chuck to turn the foot of this rough turned bowl to fit my Nova Chuck with large jaws. The bowl was a bit warped on top and somewhat out of round; however, it fit nicely into the Rim Chuck so I could turn the foot to fit my chuck (see the photo below).
I never trust any of the reverse-chucking devices completely and normally give additional support with my cup-shaped live center as shown in the photo.
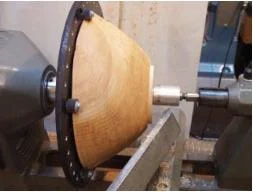 Using a Rim chuck to turn the foot of my rough-turned bowl
With the foot turned to fit into the chuck, I mounted the bowl in the chuck and finally turned the outside and the inside. Incidentally, I used the cup-shaped live center to support the bowl in the Nova Chuck also. This allows more aggressive turning without concern of losing the bowl from the chuck.
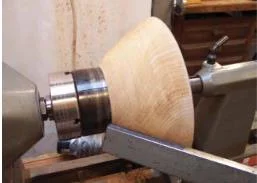 Turning the outside of the bowl when mounted in the Nova Chuck
 This cup-shaped live center doesn't mar the bowl's surface when used as support for the chuck
Drilling and Plugging with the Indexing System
I used some reddish-colored wood that we had in inventory. I don't know its name because it came from a scrapped-out crate. So I just call it "Crate Wood". This board was 3/4" thick. I used a plug cutter to cut enough plugs to fill 24 holes around the rim of the bowl.
I then used a Forstner Drill in the Oneway Drill Wizard to drill the 24 equally spaced holes, the maximum indexing positions on my Nova DVR 3000. Actually, I glued in a plug each time I drilled a hole. The glue used was Tite-Bond 2, which is the glue that I use almost exclusively. I've never had a glue joint fail with this glue, which is a good reason to continue its use.
How indexing works: Most lathes with an indexing feature have a series of holes or notches on the headstock spindle (or a plate attached to it). A spring-loaded pin locks the spindle at each indexed position, allowing you to rotate the workpiece to exact, evenly-spaced positions without measuring. The Nova DVR 3000 has 24 indexing positions (15° apart). Other common configurations are 36 positions (10° apart) or 48 positions (7.5° apart). Combined with a drill mounted in a jig like the Oneway Drill Wizard, this allows you to drill perfectly spaced holes at a consistent depth and angle every time.
 Drilling the 24 equally-spaced holes with the Oneway Drill Wizard and my 3/8" drive drill motor that had to be purchased to fit the collar of the Drill Wizard
Finishing the Bowl
Once the glue was dry, I turned away the tops of the plugs, finish-sanded, and applied finish to the inside and outside of the bowl.
Turning the plugs flush: Take very light cuts with a freshly sharpened gouge when turning across the plug grain — the contrasting wood's grain runs perpendicular to the rim, so there's a transition in cutting resistance at each plug boundary. A skew chisel laid flat makes an excellent scraping cut for this.
 A view of the bowl from the side after sanding and finishing
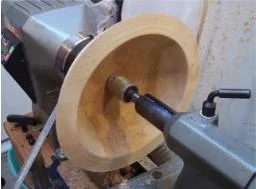
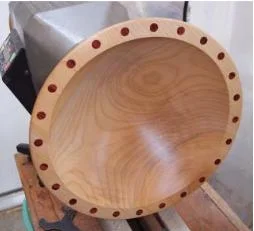 A view of the top of the bowl while still mounted on the lathe
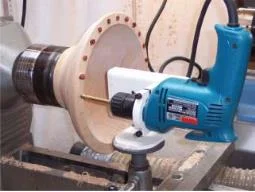
Reverse-Turning the Foot
The bowl was now ready to reverse and turn the foot. I would have normally reversed the bowl onto my vacuum plate made by Vicmarc that I've had for a number of years. However, the Rim Chuck was easier to set up and worked very well. Again, for safety sake, I used tailstock support; something that I do with any reverse turning method, whether it is a jam chuck, a vacuum chuck, a Longworth Chuck, or the Rim Chuck.
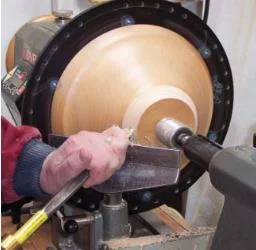 Turning the foot of the bowl. The tailstock was removed for final turning away of the little tenon in the center and for final sanding
Other Decoration Techniques to Try
If you haven't tried decorating one of your bowls, perhaps it is time that you gave it a try. The plug inlay method above is one of the simplest approaches, but woodturners have developed many ways to embellish turned forms:
- Pyrography (woodburning): Use a pyrography pen to burn patterns, borders, or textures onto the turned surface. Celtic knots, geometric bands, and nature motifs are popular. Works best on light-colored, tight-grained woods like maple or birch.
- Textured cuts: A wire brush, rotary carving tool, or even a pointed tool pressed against spinning work can create repeating textures — spirals, chatter marks (intentional ones), or stippled surfaces.
- Colored inlay: Fill carved grooves with crushed stone, metal powder, or colored epoxy for high-contrast linear decoration.
- Rim beads: Turn a series of small beads along the rim using a skew or beading tool — adds visual weight and a traditional look.
- Carved flutes: Alan Stirt demonstrated carving flutes on turned bowls using a reciprocating gouge (FWW #66, 1987). The contrast between the smooth turned interior and textured exterior is striking.
- Erosion carving: For a more dramatic effect, see our erosion vase project — Neil Scobie's technique of carving and piercing through thin walls to reveal the vessel's interior.
The simplest decorations — a single band of burned dots, a ring of contrasting plugs — often have the most impact because they draw the eye without competing with the wood's natural grain.
This guide was written by Fred Holder
Frequently Asked Questions
Written by Vince
Vince is a woodturner and the founder of WoodturningOnline. He writes tool reviews, buying guides, and turning tutorials to help woodturners at every level make informed decisions about their craft and equipment.