Project: Erosion Vase
This is a project by the late master turner Neil Scobie — an Australian woodturner known worldwide for his turned-and-carved sculptures, particularly his erosion bowls and waveform vessels. Neil trained as an Industrial Arts teacher in the 1970s, went professional in 1993, and spent decades demonstrating at symposiums across the US and Europe. His work combined precision lathe technique with freehand carving to create forms that revealed the internal structure of the vessel through the carved-away exterior.
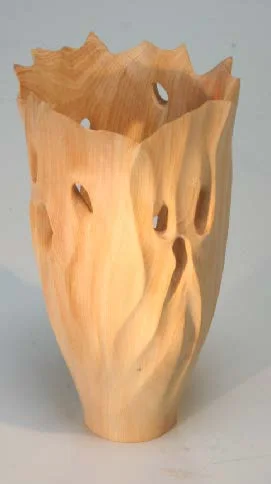
The erosion vase is one of Neil's signature forms: a hollow-turned vessel with sections of the exterior carved or pierced away, exposing the interior and creating a sense of organic decay — as if wind and water had worn through the wood over centuries. The technique sits at the intersection of turning and carving, drawing on traditions documented by John Jordan (Fine Woodworking #85, 1990) and Alan Stirt (Fine Woodworking #66, 1987), both of whom wrote extensively about combining turned forms with hand-carved textures.
What You'll Need
Tools:
- Spindle gouge and bowl gouge for turning the exterior and interior
- Hollowing tool (or a bent scraper) for reaching inside the vessel
- Rotary carving tool (Proxxon, Dremel, or Foredom flex shaft) with carbide burrs
- 3mm drill bit for piercing
- Small drum sander or sanding mandrel
- Strips of cloth-backed abrasive (120–320 grit)
- 5B pencil for marking the design
Materials:
- A close-grained hardwood blank without defects. Neil recommended species like huon pine, she-oak (Casuarina), or silky oak for Australian turners. For North American turners, cherry, hard maple, or birch work well — you need tight grain that won't crumble when carved thin. Avoid open-pored species like oak or ash, where the carved edges will be ragged.
- Blank size depends on your desired vase proportions, but start with at least 4" diameter × 8" long for a first attempt.
Design Proportions
Neil's rule for the erosion vase was a height-to-width ratio of 1:1.6 — close to the golden ratio. For a vase that's 4" wide at its widest, aim for about 6.5" tall. This creates a form that feels balanced and elegant rather than squat or stretched.
Sketch the erosion pattern before you start carving. The carved/pierced areas should flow organically — avoid symmetrical cutouts, which look mechanical rather than natural. Study how water erosion actually works on stone: it follows weakness in the material, creating irregular openings that taper and connect.
The Process
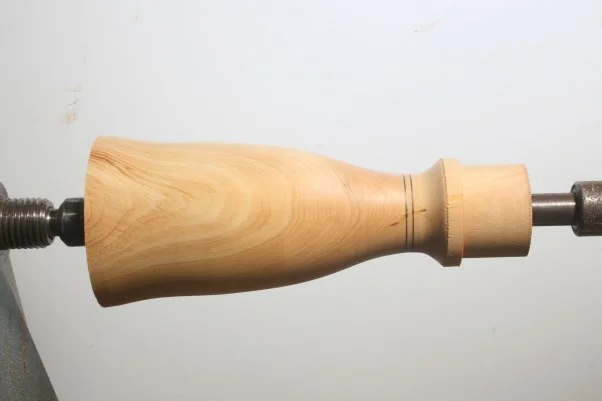
Step 1: Turn the Exterior
Mount the blank between centers and turn the exterior profile to your desired vase shape. Aim for smooth, flowing curves — the erosion pattern will add visual complexity, so the base form should be simple.
Step 2: Turn Between Centers
Refine the shape. The walls need to be thick enough to support the carved areas but thin enough that the erosion reads as natural. A good starting wall thickness for the areas you plan to carve through is 6–8mm — thin enough to pierce, thick enough to hold together during carving.
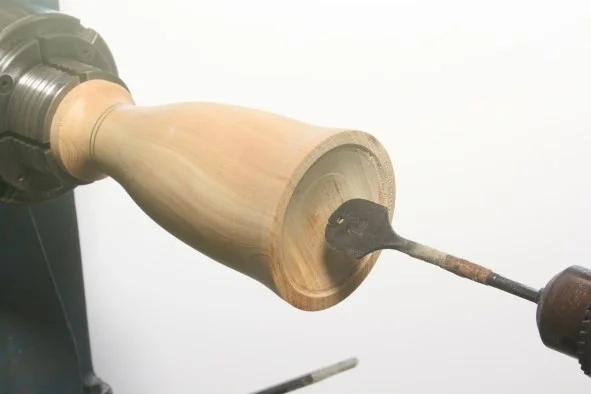
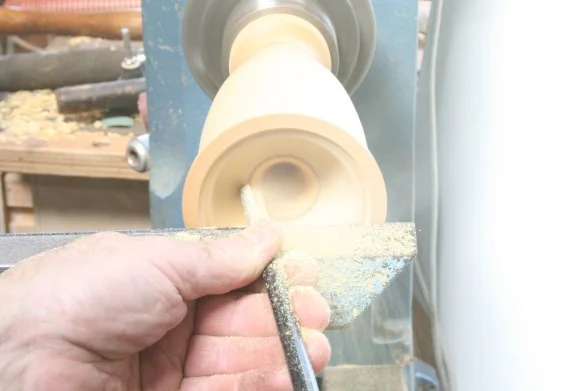
Step 3: Hollow the Interior
Drill a depth hole with a round-end Forstner or speed bore drill, then hollow out the interior with a hollowing tool or bent scraper. Target a 6mm wall thickness throughout — uniformity matters because uneven walls will show when you carve or pierce through the exterior. Check wall thickness frequently with calipers or a dedicated wall-thickness gauge.
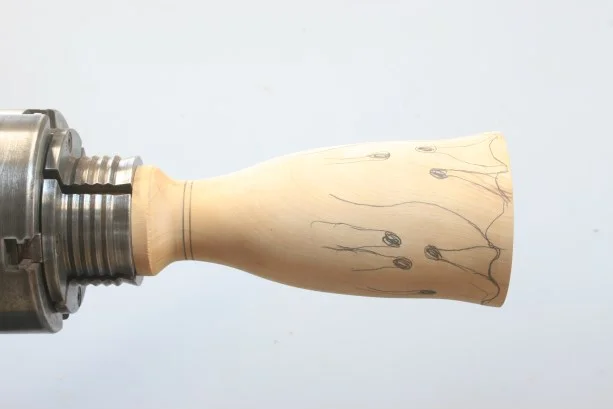
Step 4: Draw the Design
With the piece still mounted on the lathe (but stationary), draw your erosion pattern directly onto the wood with a soft 5B pencil. The design should look like weathered stone — irregular holes, flowing edges, areas where the wall transitions from full thickness to paper-thin to open. Consider the profile from multiple angles: rotate the piece and ensure the pattern reads well from all viewing directions.
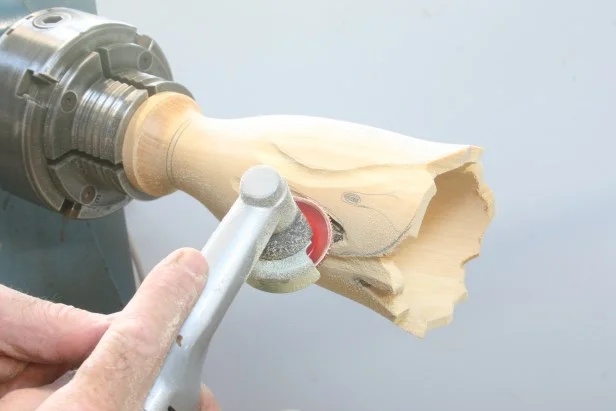
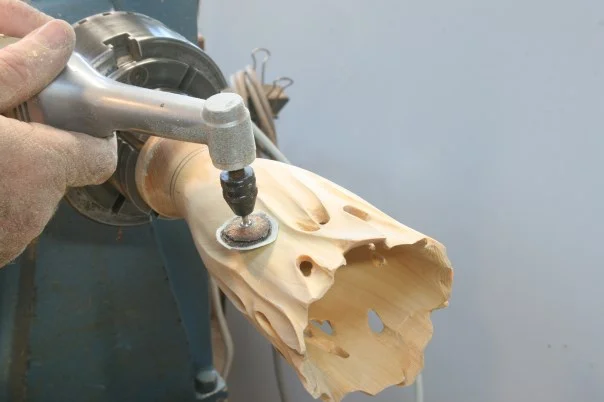
Step 5: Rough Out the Shape
Using a Proxxon (or Dremel/Foredom with a carbide burr), rough out the carved areas. Work from the center of each erosion area outward toward the edges. Remove material gradually — you can always take more off, but you can't put it back. The carved surfaces should have an organic texture, not a machined smoothness.
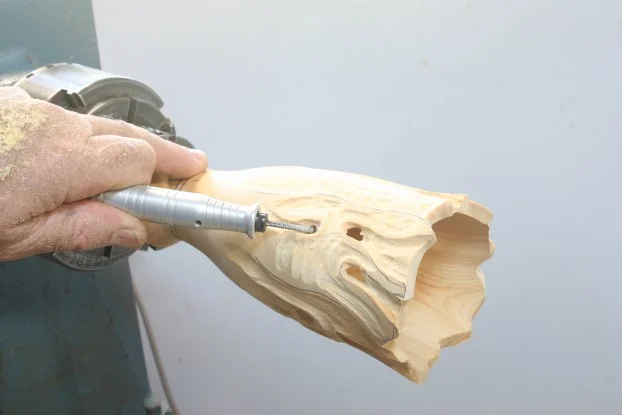
Step 6: Pierce the Holes
For areas where you want to break through the wall completely, drill from the outside with a 3mm bit, then enlarge and shape the openings with the rotary tool. The pierced holes should vary in size and shape — round, oval, elongated. Some should connect to create larger openings; others should remain isolated.
Step 7: Refine and Sand the Carved Areas
Sand the carved surfaces with a small soft sander or sanding mandrel. The goal is to smooth the carved texture without making it look machine-finished — you want the tool marks softened, not eliminated. Work through 120, 180, and 240 grit.
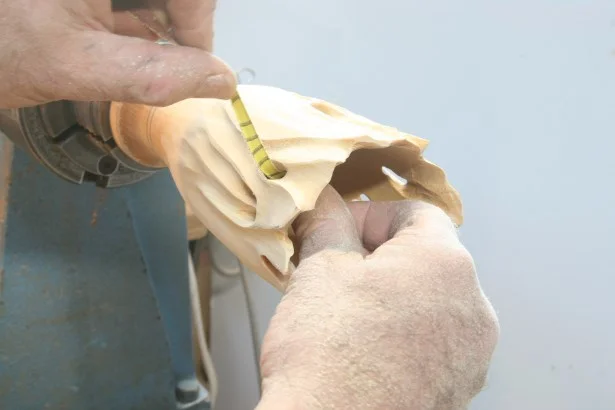
Step 8: Sand the Pierced Holes
Thread strips of cloth-backed abrasive through the pierced holes and sand the interior edges smooth. This is tedious but essential — rough edges inside the piercings look unfinished and can catch on things. Work through 180 and 240 grit minimum.
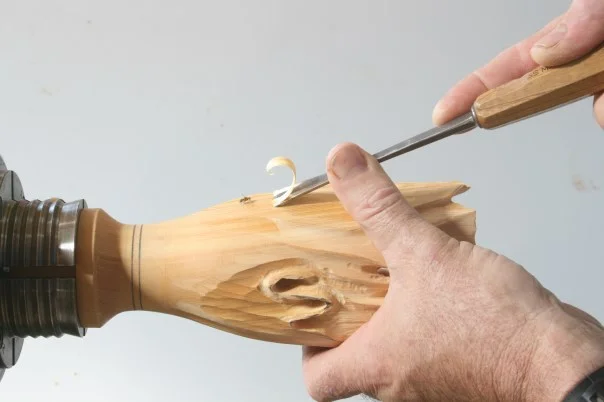
Step 9: Add Gouge Work (Optional)
For areas where you want a carved texture rather than pierced holes, use small gouges to create fluted or scalloped surfaces. This adds another layer of visual interest — the contrast between smooth turned surfaces, carved textures, and open piercings is what makes the erosion vase compelling.
Finishing
For a natural look that emphasizes the wood grain through the pierced sections, use a wipe-on oil finish (Danish oil or tung oil). Apply with a small brush to reach inside the carved areas. Avoid heavy film finishes like lacquer, which can pool in the carved details and obscure the texture.
If the wood is light-colored (maple, birch), you can ebonize the carved areas with India ink or iron acetate solution to create contrast between the smooth turned exterior and the weathered interior.
Tips from Neil's Approach
- Grain direction matters for carving: Carve with the grain whenever possible. Against the grain, the rotary tool will tear fibers rather than cut them cleanly.
- Wall thickness uniformity is critical: Uneven walls show through the piercings as thick and thin spots, breaking the illusion of natural erosion.
- Less is more: The negative space (the holes and carved areas) defines the form as much as the remaining wood. Don't carve away so much that the vessel loses structural integrity — a collapsed erosion vase is just broken wood.
- Light reveals the form: Position the finished piece where light passes through the piercings. The interplay of light and shadow through the carved wall is the entire point of this form.
Frequently Asked Questions
Related
- Best woodturning tools — the gouges and scrapers you need for hollow forms
- Best wood for woodturning — species that carve cleanly for erosion work
Written by Vince
Vince is a woodturner and the founder of WoodturningOnline. He writes tool reviews, buying guides, and turning tutorials to help woodturners at every level make informed decisions about their craft and equipment.