How to Use a Wood Lathe: A Beginner's Guide
In this article, we go over a basic description of how a lathe works, and how to operate it.
About this guide — This guide covers the fundamentals every new turner needs — from understanding lathe parts to making your first cuts safely.
What is a Lathe?
A lathe is a tool into which various workpieces can be placed for operations like cutting, drilling, sanding, turning, etc. The workpiece is rotated by the lathe such that it is in the appropriate position to be operated upon.
This is especially useful for creating multiple pieces with identical symmetry as you can measure the distance from the axis as the workpiece rotates and you can cut, sand, or drill it, to name a few options.
Different types of lathes are required for working with various materials. A wood lathe, therefore, is a tool that is used to work with wooden material.

A lathe, whether for wood or any other material, is not the easiest tool to use. It can be complicated and even dangerous in the hands of an inexperienced person. But that does not mean one cannot have a strong learning curve with a lathe.
There are a few things you should know about using a lathe and the following sections will attempt to cover some of the important basics.
Components
To be able to use a wood lathe effectively, one must know about the components that go into a lathe. The following is a short breakdown of the components one will be working with while using a wood lathe:
Motor
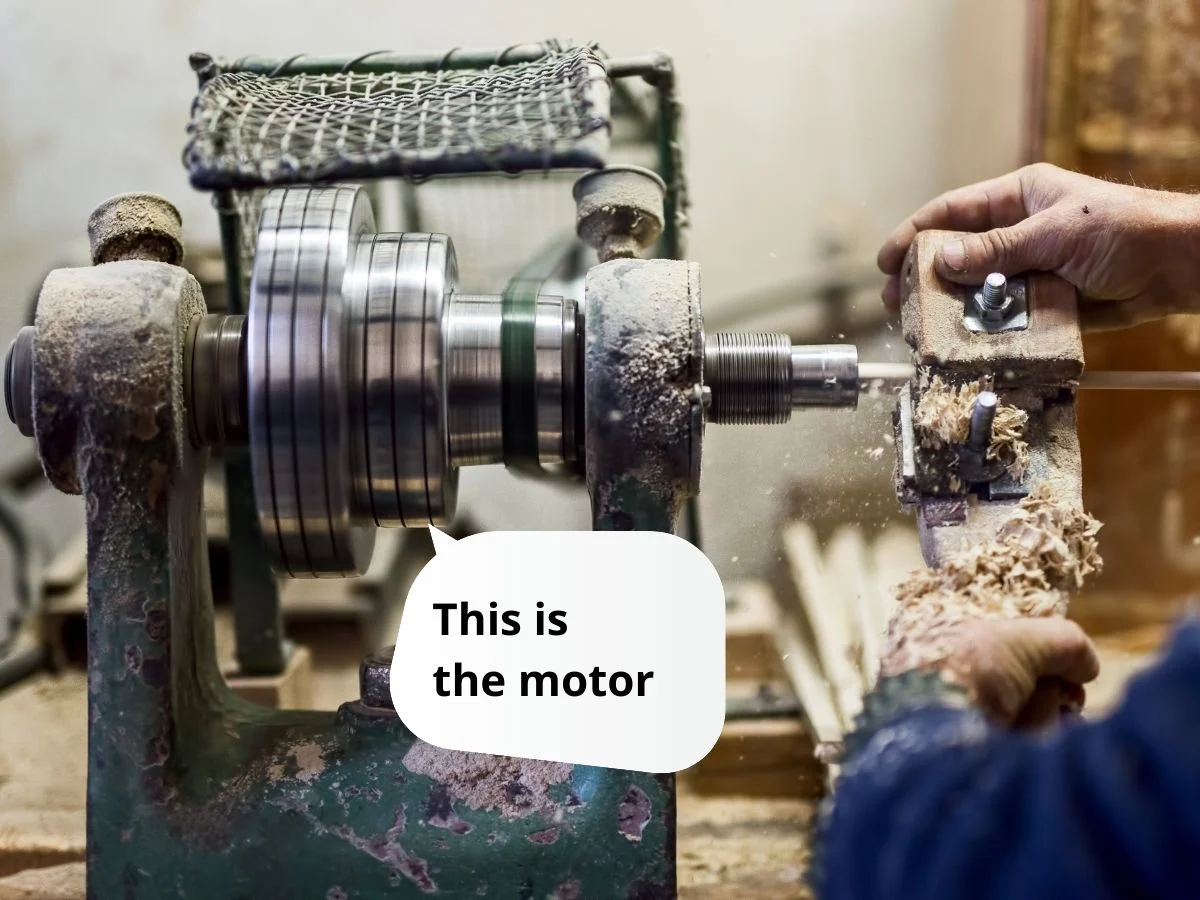
A lathe is a powerful tool that needs a motor to run. It is also an electrical tool that will be connected to a socket, which in turn powers the motor. This motor will be located towards the left region on the lathe’s design, known as the headstock. Usually, a lathe will have horsepower between 3/4 to 2 HP, but this may vary based on the size of the tool.
Tool Rest
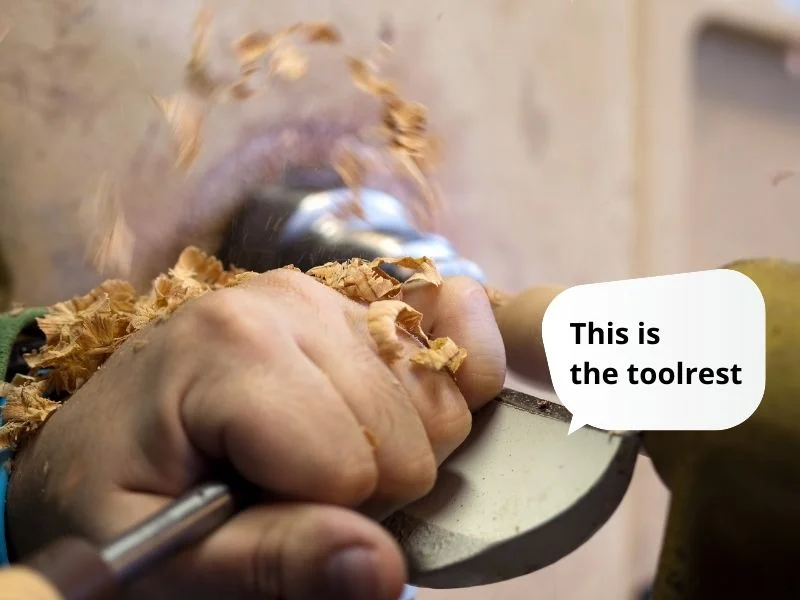
The tool rest is that part of the machine where, as the name suggests, you can rest the tools you are working with. A lathe can be dangerous to use if you are not handling the tools correctly.
The tool rest offers you the option of placing whatever tool you are working with on it when it is not in use. This not only gives you a safe spot to rest your tools, but it also makes the whole apparatus more convenient.
Depending on the size of the lathe you have, there may be different types of tool rests, but it is quite common to have a four-position tool rest that allows you to switch safely between tools while the machine is running.
Controls
Whenever there is electricity and a motor involved in a power tool, you also need to have a way to control the machine so you can get the best use out of it and can also ensure safety. Speed control is one of the biggest aspects of using the wood lathe accurately and to the optimal.
The speed control on the wood lathe is typically on a belt pulley which has both electric and mechanical switches. Varying between these controls allows you to change and control the speed of the lathe’s rotation. The speed usually ranges between 500 and 3,000 RPMs. The smaller the piece you are working on, the higher the RPM required will be as it allows you to get a better cut.
Headstock and Tailstock

As mentioned above, the headstock is on the left of the wood lathe and has the motor that powers the lathe. On the other side of the unit is the tailstock. The position of the tailstock can be adjusted based on the size and type of project you are working on.
One of the most important duties of the tailstock is to ensure the spindle is in the right position and rotates evenly. If the spindle’s movement is impacted, either because of speed (which the motor in the headstock controls) or incorrect position (which the tailstock controls), the lathe will not be effective. The tailstock allows one to work with projects of various sizes and shapes as it can be adjusted according to the workpiece at hand.
In other words, the headstock and tailstock will be on either end of the wood stock you are working with.
Using the Lathe
Now that you are familiar with the components of the lathe, it will be easier to understand how to use it better. The following are some of the things to keep in mind:
Finding the Right Size
First things first, you need to find the right lathe for your project. If you use an industrial-size lathe for a small home improvement project, it will be more difficult to control the workpiece.
Similarly, a benchtop lathe will not be useful for working on a project on a larger scale. So pick a lathe that has the right horsepower, swing, bed length, and size for your project.
You must also pick out the right kind of tool for the project you are working on. Some of the common and useful tool pieces include parting tools, skew chisels, and roughing gauges.
Setting up the Lathe
When you are setting the machine up, ensure that it is switched off to avoid any potential accidents. Once you have checked that the machine is powered off, begin by organizing the tools you will be using and arrange them on the tool rest according to the order in which you might need them.
This is important as you cannot afford to fumble while operating the lathe. Using the wrong tool while the spindle is rotating could not only damage the product but could also be unsafe.
You should also ensure that all your tools have been appropriately sharpened as blunt tools can also cause your workpiece to chip off and even fly off the bed length if it is not secured properly.

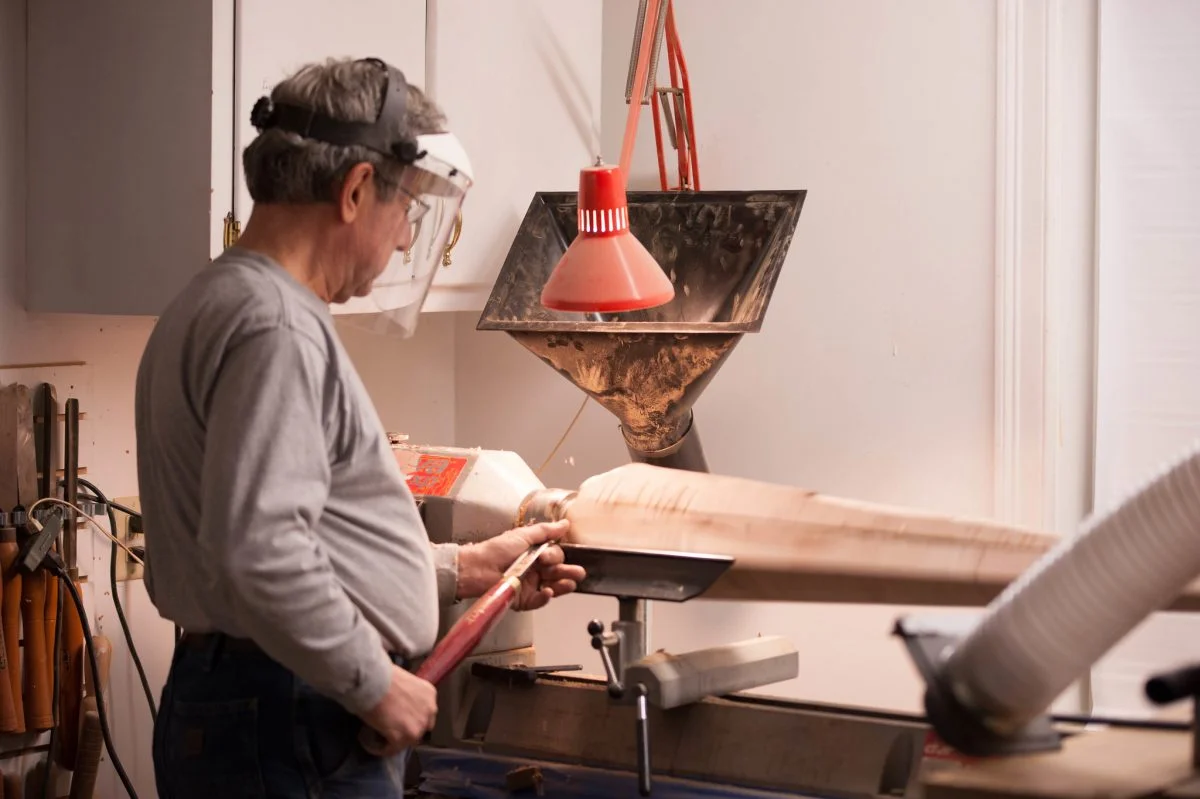
Using the Lathe
Once you have completed the setup, turn the tailstock so you get the right position for operating your workpiece. If you are a beginner, it might be easier to use a softer wood, then gradually move on to more complex woods.
Mark the center of both ends of the wood piece you are working with, then place it between the lathe centers. Tighten the tailstock so your wood piece is held securely in place. The wood piece is required to be above the headstock’s spindle and securely inside the spur’s center.
Another important note is to ensure the tool rest is aligned with the stock you are working with, while also maintaining a comfortable and safe distance between the tool rest and the stock.
The speed you should use will vary depending on the type of wood you are using. You can find various tutorials online for specific types of woods and the speed they work best with. But if you are ever unsure, it is best, to begin with, the lowest speed possible and then gradually scale up based on the requirement.
Here's a video for those of you who prefer visuals:
https://www.youtube.com/watch?v=kWBzAgqeCmA
Your First Turning Project: A Practice Spindle
The best way to learn is to start cutting wood. This exercise takes about 30 minutes and teaches you the three fundamental skills: roughing, shaping, and parting.
- Select your blank — a 2" x 2" x 8" piece of soft hardwood (cherry, poplar, or maple). Avoid pine — it tears instead of cutting cleanly.
- Find centers — draw diagonal lines corner-to-corner on each end. Where they cross is your center.
- Mount between centers — seat the spur center (headstock) into one end and bring up the live center (tailstock). Hand-tighten, then give the handwheel a quarter turn. Spin the blank by hand to make sure it clears the tool rest.
- Set the tool rest — position it about 1/8" from the nearest corner of the blank, at or slightly below center height.
- Set speed — for a 2" square blank, start at 800–1,000 RPM. You can increase speed once it's round.
- Rough to a cylinder — with a roughing gouge, start at the center and make light cuts toward each end. Let the bevel ride behind the cutting edge. Within a few passes, you'll have a smooth cylinder.
- Practice cuts — try coves (rolling a spindle gouge into the wood), beads (pushing a skew or spindle gouge forward), and parting cuts (pushing a parting tool straight in). These three cuts are the foundation of all spindle turning.
As Fine Woodworking #44 (1984) advises on body position at the lathe: stand with feet shoulder-width apart, weight balanced, elbows close to your body. The tool should do the work — don't muscle it. Move your whole body along the lathe rather than reaching.
Common Beginner Mistakes
- Starting too fast — large or out-of-round pieces need slow speeds. Use the RPM table below. A blank that's vibrating or bouncing is always spinning too fast.
- Dull tools — a dull gouge tears the wood instead of cutting it. If you're getting torn grain, sharpen before anything else. Peter Child wrote in Fine Woodworking #5 (1977) that beginners should "sharpen twice as often as they think necessary."
- Tool rest too far away — keep it 1/8" from the workpiece. Adjust frequently as the diameter changes. A gap between the tool rest and the wood is where catches happen.
- Forcing the cut — let the bevel ride. If you're white-knuckling the tool, you're using too much force. Richard Raffan's approach in Fine Woodworking #136 (1999) emphasizes light touch and letting the tool's geometry do the cutting.
- No face shield — wood can fly off the lathe, especially when roughing out-of-round stock. A full face shield (not just safety glasses) is essential. See our safety equipment guide.
Turners on r/turning and r/BeginnerWoodWorking consistently reinforce these mistakes — and add a few more:
- Buying nice wood too early — practice on cheap or free wood first. Scrap hardwood, firewood, and storm-downed trees are all excellent practice material. As one experienced turner advised: "Don't spend money on nice wood until you've practiced a lot on shitty wood."
- Skipping the learning curve on sharpening — many beginners don't realize their brand-new tools aren't sharp enough. The turning community unanimously recommends learning to sharpen immediately. A slow-speed grinder with a Wolverine jig is the most commonly recommended setup.
- Underestimating the dust — woodturning generates far more dust than most woodworking. Multiple turners who tried turning indoors (in garages, basements, even kitchens) report dust spreading through the entire house. Invest in dust collection and a quality respirator from day one.
- Not joining a club — the r/turning community consistently recommends joining your local AAW chapter or taking a class at Rockler or Woodcraft before investing in equipment. Hands-on instruction from experienced turners is worth "a million YouTube videos."
RPM Reference Table
| Workpiece Diameter | Roughing (RPM) | Finishing (RPM) | Max Safe RPM |
|---|---|---|---|
| 2" (pen blank) | 1,500–2,000 | 2,500–3,000 | 4,500 |
| 4" (small bowl) | 800–1,200 | 1,500–2,000 | 2,250 |
| 6" (medium bowl) | 600–900 | 1,000–1,500 | 1,500 |
| 8" (large bowl) | 500–700 | 800–1,200 | 1,125 |
| 10" (platter) | 400–600 | 600–900 | 900 |
| 12"+ (large platter) | 300–500 | 500–700 | 750 |
Rule of thumb: Diameter (inches) × RPM should stay below 9,000. Start slower and increase as the piece becomes balanced and round.
Frequently Asked Questions
Now that some of the basics of using a wood lathe are out of the way, the following are some frequently asked questions you may want to be answered:
-
**What about safety equipment?**Safety equipment is important when you are using a wood lathe. Safety goggles are a must as you want to protect your eyes from flying pieces of wood. But even inhaling sawdust is not good for you, so you may even want to consider investing in a face shield. Ensure there are no loose bits of hair, clothing, etc. that could get caught in the lathe. Read our safety guide.
-
**How much experience does one need?**The more practice you get on a lathe, the better your technique will become. In other words, no amount of practice is enough, there is always scope for more. Practice using spare stock so you can gauge how to work with different types of wood. Find out about other things that make woodturning difficult.
-
**Why is there so much resistance?**This is completely normal when you are using the lathe. No matter how soft the wood, it is still a solid block of matter that is not immediately malleable.When you feel resistance upon applying the tool bit to the stock, you know the lathe is working. The stock will be rotating on the spindle quite fast, so you only want the cutting edge to touch the wood.Do not force the tool no matter how much the resistance, as you risk jamming the tool into the wood or losing your grip on the tool.
What Can You Make on a Wood Lathe?
Among the larger projects, chair legs, table legs, and baseball bats can be made with a wood lathe. Smaller projects include bowls, pen casings, cups, rings, vases, candleholders, birdhouses, ornaments, captive-ring rattles, and hollow forms. Possibilities are only limited by your imagination. Check out our project tutorials for inspiration.
Final Thoughts
A wood lathe is a complex machine tool to use, but it can be extremely rewarding when used correctly. Sure, you require some experience and practice to use it but one cannot acquire the said experience without at least trying.
It is important to start slow, but start! Practice with small pieces of stock and start the machine at a low speed. Gradually work your way up to bigger pieces and harder pieces of wood stock.
A wood lathe is one of the oldest types of lathes and has been used for ages to create extraordinary things out of an ordinary piece of wood. Used correctly, it can be the most useful tool in your kit.
Next Steps
Once you're comfortable with basic lathe operation, expand your skills with these resources:
- Best woodturning tools — what tools to buy and why
- Best wood lathes — upgrading from your first lathe
- Lathe chuck types — understanding workholding
- Sharpening woodturning tools — keeping your tools in cutting shape
- What is woodturning? — deeper dive into turning types and techniques
- Best wood for woodturning — choosing the right species
- Best woodworking classes — learn hands-on from a pro
- Can you make money from woodturning? — turning your hobby into income
Frequently Asked Questions
Written by Vince
Vince is a woodturner and the founder of WoodturningOnline. He writes tool reviews, buying guides, and turning tutorials to help woodturners at every level make informed decisions about their craft and equipment.